Page 5 of 5
Re: M42 chronicles
Posted: Wed Mar 11, 2020 5:07 am
by donstim
Yeah, I forgot he mentioned Hyperstar. That does put the camera at the front, which would remove any mount clearance issues. As far as undersampling goes, the Hyperstar can be installed or removed as desired. So it's not like he has a permanent 406.4 mm focal length scope. He can also operate at the full focal length of 2032, and if he gets a .63x reducer/flattener (more money!), he could also operate at 1280 mm.
Re: M42 chronicles
Posted: Mon Apr 03, 2023 9:53 pm
by turfpit
A 2023 Orion effort just before the clocks went forward. Orion sat directly over Manchester City Centre (Bortle 6++) leaving some tricky light gradients to deal with.
Captured with a Canon 7D Mk2 with Super-Tacumar 135mm f3.5 M42 lens (£30 from eBay, £8 for an M42 to EOS adapter)). Celestron AVX mount, unguided.
190x10s lights @ ISO 800. 50 each darks, flats, dark flats. Focus with a small Bahtinov Mask.
Processed twice for practise - Astro Pixel Processor & PixInsight (plenty of satellite trails handled by both programs).
The plan was 30s exposures @ ISO 1600 but the skyglow with the wide field lens was a problem giving an over saturated histogram. Clouds started around frame 200, so 30 of 220 frames were binned by inspection (Blink in PixInsight).
The wide field lens brought a new set of problems. One was the light gradient the other was horizontal banding on the original flats. It turns out that the Adafruit EL panel had an inverter running at 100Hz which synched nicely with my 0.01s flats exposure. Solved by re-taking the flats with an ND8 filter which got the exposures to 0.125s (H/T to Brian @oopfan for resolving that one).

- Orion-wide-field_190x10s.jpg (917.15 KiB) Viewed 3211 times

- Orion-wide-field-light-gradient.JPG (32.34 KiB) Viewed 3211 times
Evaluation - colours in stars, Running Man and Horsehead Nebula (just) with 10s exposures - happy with that at 1st widefield lens attempt. A far cry from the first image I posted on this thread.
Maybe a mosaic including Barnard's Loop next time Orion comes around?
Dave
Re: M42 chronicles
Posted: Thu Apr 06, 2023 6:25 pm
by timh
Interesting Dave, I enjoyed scanning back to see the evolution there. It is certainly true that every time you change setup it brings new problems and new learning. Part of the reason that I have gone with deep sky narrowfield views of objects thus far is that in some ways it is easier - particularly wrt tilt - flattening etc . where it just doesn't matter so much if you can lose most of the field. Widefield views are nice but technically difficult to get right once you start obsessing about the shapes of stars in the far corners etc. I'm still playing with the refractor making incremental improvements.
So impressive what you have managed there with just a cheap lens and what looks like an enormous amount of sky glow to magic away. I have just switched to a Baader UV/IR cut filter from the ZWO one because it is a bit narrower (blocks outside of 400-700nm) and it did seem to help with colour -i.e. preventing overly blue/ purple around some of the blue/white stars - which now look 'more correct' as judged by comparison with Newt images of the same objects. Anyway quite jealous of you being able to image M42 at all. A big oaktree completely blocks my Southern horizon -- but my daughter has just bought a place with a better aspect south - so maybe next winter. Tim
Re: M42 chronicles
Posted: Fri Apr 07, 2023 11:13 am
by turfpit
Thanks Tim.
shapes of stars in the far corners etc
Cropping can fix that, there is plenty of slack in these very wide field shots.
I acquired 2 lenses - 135mm f3.5 and 200mm f4 - to experiment with. This seemed a cheaper option than acquiring a 135mm f2 lens which typically costs ~£450. I haven't worried about filters yet but on Astrobin there are many good images produced using UV/IR cut filters with DSLR cameras.
We are in the galaxy season now - one target I have in mind is M81/M82 and to try to capture some IFN. As the year progresses, widefield targets will include such as the Cygnus region, Heart & Soul Nebulae and the Milky Way.
Dave
Re: M42 chronicles
Posted: Mon Mar 04, 2024 10:32 pm
by turfpit
Looking again at post #42. PixInsight 1.8.9-2 build 1601 released 1st March 2024 has a new process called
GradientCorrection. A one-click action provided the following improvement to a heavily light pollution affected wide field image of Orion. Note the gradient removal and the improved histogram shape.
- PI_GradientCorrection.JPG (99.97 KiB) Viewed 568 times
Using these defaults
- GradientCorrection_defaults.JPG (31.21 KiB) Viewed 568 times
No more having to place sample points for the
DynamicBackgroundExtraction process. Time to carry out some re-processing of old data and take advantage of the 20 years of the application's development.
Dave
Re: M42 chronicles
Posted: Sun Mar 17, 2024 1:56 pm
by turfpit
M42/NGC1977 - multiple exposure data captured December 2019 and re-processed using PixInsight's High Dynamic Range (HDRComposition) and High Dynamic Range Compression (HDRMT) processes.

- M42_HDR_50x10s_30x30s_30x60s_15x120s.PNG (964.75 KiB) Viewed 418 times
Hardware: Celestron CG5 Advanced GT mount, Altair 66ED refractor, 0.8x reducer/flattener, Altair 183C camera.
Software: SharpCap 3.2, PixInsight 1.8.9-2 build 1601.
Data: Lights 50x10s, 30x30s, 30x60s, 15x120s, darks 20 of each exposure, 100 flats, 100 bias.
Outline steps:
- Use WeightedBatchPreprocessing (WBPP) script to calibrate and integrate the 4 data sets.
- Colour calibration of the short exposure (10s) image with Spectrophotometry Colour Calibration (SPCC).
- Combine 4 images into HDR image using HDRComposition.
- Check HDR mask covers washed out region of highest exposure image (120s).
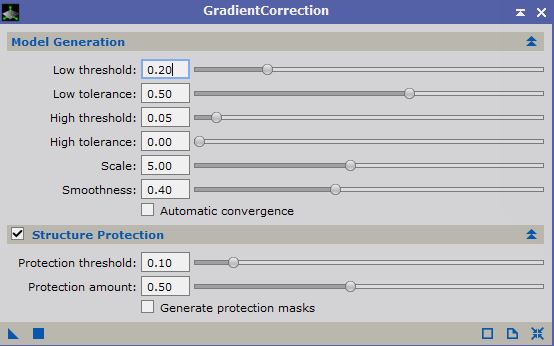
- Remove gradients with GradientCorrection process.
- Perform background neutralisation with BackgroundNeutralization process.
- Delinearise image with Screen Transfer Function and HistogramTransformation.
- Use ChannelExtraction to create lightness mask.
- Apply dynamic range compression with HDRMT.
- Use lightness mask with CurvesTransformation to adjust contrast of highlights.
- Use lightness mask inverted with CurvesTransformation to adjust contrast of shadows.
Calibration & Integration

- WBPP.jpg (401.4 KiB) Viewed 418 times
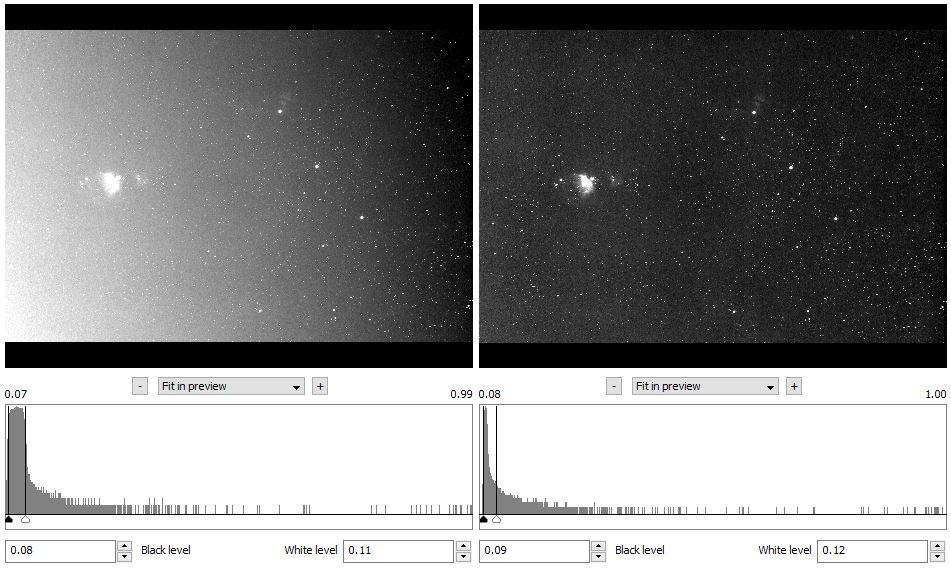
Colour calibration of shortest exposure

- before_SPCC.JPG (38.82 KiB) Viewed 418 times

- after_SPCC.JPG (88.78 KiB) Viewed 418 times
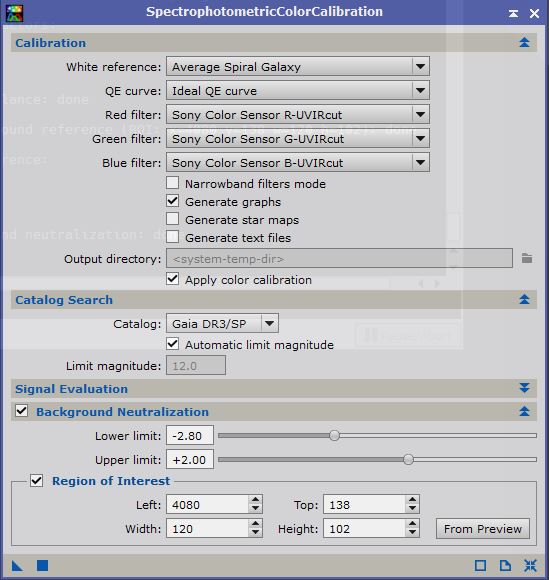
- SPCC_settings.JPG (58.09 KiB) Viewed 418 times
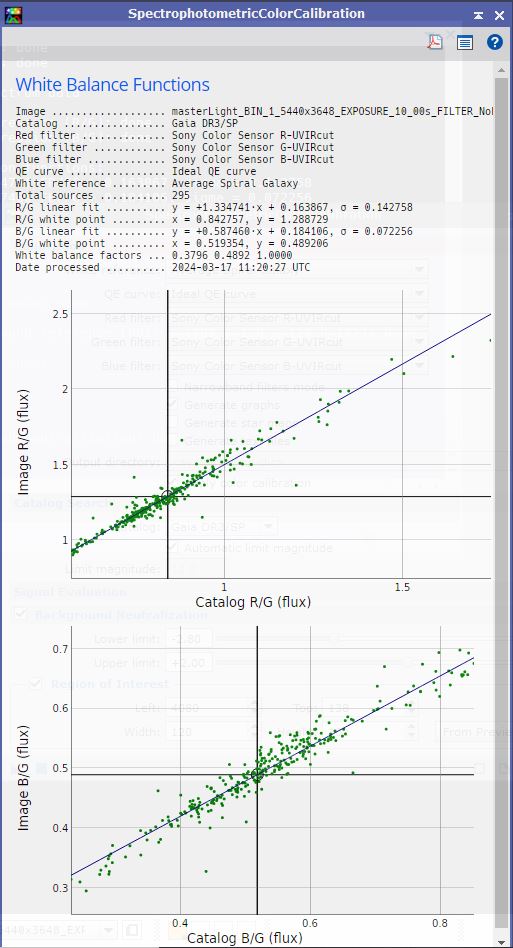
- SPCC_graphs.JPG (83.23 KiB) Viewed 418 times
Create HDR image

- HDR.JPG (77.24 KiB) Viewed 418 times

- HDR_mask.JPG (30.48 KiB) Viewed 418 times

- HDRComposition.JPG (50.67 KiB) Viewed 418 times
HDR mask check

- mask_check.PNG (454.56 KiB) Viewed 418 times
Remove gradients in HDR image

- HDR_GradientCorrection.JPG (74.77 KiB) Viewed 418 times

- GradientCorrection.JPG (39.09 KiB) Viewed 418 times
Perform background neutralisation

- HDR_after_BackgroundNeutralisation.JPG (78.58 KiB) Viewed 418 times

- BackgroundNeutralisation.JPG (29.46 KiB) Viewed 418 times
Delinearise image

- delinearisation.JPG (72.94 KiB) Viewed 418 times
Create Lightness mask using ChannelExtraction

- Lightness_mask.JPG (89.1 KiB) Viewed 418 times

- ChannelExtraction.JPG (25.49 KiB) Viewed 418 times
Apply Dynamic Range Compression

- after_HDRMultiscaleTransform.JPG (73.47 KiB) Viewed 418 times

- HDRMultiscaleTransform.JPG (25.12 KiB) Viewed 418 times
Lightness mask and CurvesTransformation to adjust highlights contrast

- adjust_highlights_contrast.JPG (63.65 KiB) Viewed 418 times
Lightness mask and CurvesTransformation to adjust shadows contrast

- adjust_contrast_shadows.JPG (75.85 KiB) Viewed 418 times
Learning resources
Preparation
The new colour calibration tool, SPCC, requires an astrometric solution in the image data. To do this I had to get the PixInsight Image Resolver working as the data had no RA/DEC information. This required download of the Gaia files for Image Resolver and SPCC (~120Gb).
Also to tidy up some FITS header anomolies from the SharpCap 3.2 version I used the PixInsight script
BatchFITSKeywordEdit to bulk edit BAYERPAT & COLORTYP and remove BAYEROFFX & BAYEROFFY in 325 images (lights, darks, flats, bias).
Use of these PixInsight High Dynamic Range processes now gives scope for being able to handle longer M42 exposures than I have previously attempted.
Dave
Re: M42 chronicles
Posted: Sun Mar 17, 2024 3:04 pm
by oopfan
Hi Dave,
Thanks for the great write-up! I have a question. Let me repeat your Lights exposure times. You wrote:
Data: Lights 50x10s, 30x30s, 30x60s, 15x120s
When I convert to Integration Time, I get:
Data: Lights 500s, 900s, 1800s, 1800s
IMO, you won't gain much faint nebula by moving up to 240s exposure. I'd recommend increasing the size of the 120s stack until you achieve 30x120s.
EDIT: My reasoning is that your Bortle 6 skies won't benefit from longer and longer exposure times, but you will benefit from longer Integration Times.
Brian
Re: M42 chronicles
Posted: Sun Mar 17, 2024 3:44 pm
by turfpit
Brian
Thanks for the comments. I agree with you that Bortle 6 brings its limits for longer exposures. I will try for a larger integration time with 120s exposures. The AVX mount I have now will cope better than the CG5 did. It might be too late in the year now as Orion heads towards the Manchester soup in the west. I need to find a suitable lower exposure time - maybe 30s? I feel a 2 image HDR solution might give better results. I suppose it will be an experiment to find suitable values.
There was a time when I thought 120s would be unrealistic for M42 but now, with the right tools, anything is possible.
Dave
Re: M42 chronicles
Posted: Sun Mar 17, 2024 4:00 pm
by oopfan
Dave,
Yes, too short of an exposure brings its own set of problems. I think you are good with 3 stacks: 30s, 60s, and 120s. Then just concentrate on reducing noise by increasing Integration Time like 50x30s, 50x60s, and 50x120s.
Brian